This Sudoku guide uses a real puzzle to show how a Sudoku is solved systematically: from the givens to the last number, in 49 steps with a picture each. The guide is aimed mainly at beginners; experienced players will do many of the in-between steps in their heads.
All you need are the Sudoku rules: every digit from 1 to 9 appears exactly once in every row, every column, and every 3×3 box. Everything else follows as you solve.
The method in brief
- Digit by digit: Go through the digits 1 to 9 one at a time and look for the boxes where the digit is still missing.
- Ruling out cells: If the digit already appears in a row or column, it can no longer go in any other cell of that row or column.
- Setting pencil marks: If only two or three cells are left in a box, write the digit there in small print as a pencil mark.
- Entering: If only one cell is left, enter the digit and cross out its pencil marks in the row, column, and box.
- Filling in: If only one or two numbers are missing in a row, column, or box, fill them in right away.
If you get stuck on a puzzle of your own, the Sudoku Solver shows the next step with the reason. The solving techniques explain the techniques for harder puzzles.
The guide in 49 steps
Step 1
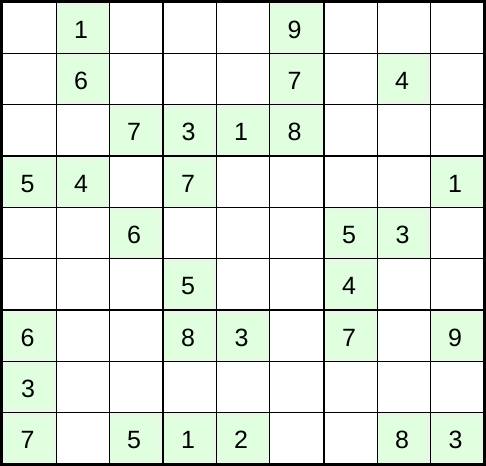
To show you clearly how to reach the solution of any Sudoku, the example below solves a Sudoku step by step. The goal isn’t to solve it as fast as possible; instead, every (helpful) intermediate step is explained in detail.
Step 2
Let’s work systematically and take a close look at each of the digits from 1 to 9, one at a time. Start with the 2: it appears only once among the givens. So at this point, the single 2 doesn’t lead to any other number. Next, look at the 6. The 6 appears only in the three boxes on the left, and here too, nothing more can be concluded from it yet.
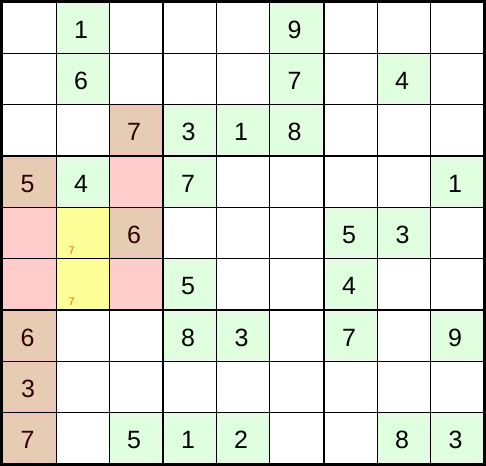
The 7 is already in the top-left and bottom-left boxes, so in the middle-left box a 7 has to go in one of the two middle cells. Note this by placing a pencil mark in each of these two cells.
Step 3
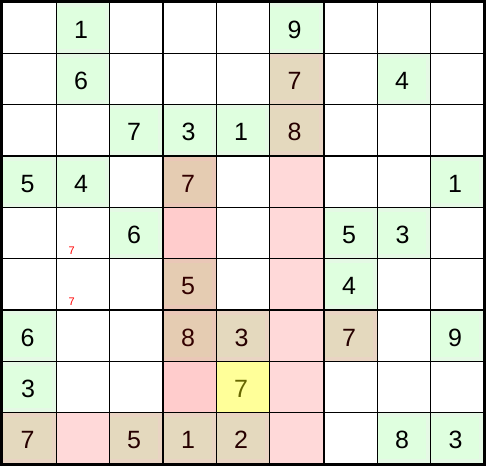
In the middle column of boxes, the bottom box is missing a 7. Since the boxes to its left and right already contain a 7, there is only one possible position for the missing 7 in the bottom-middle box. You find it by mentally running through all rows and columns of that Sudoku box and looking for the 7. In any row or column that already contains one, there can’t be another 7. So enter a 7 in the only remaining position.
Step 4
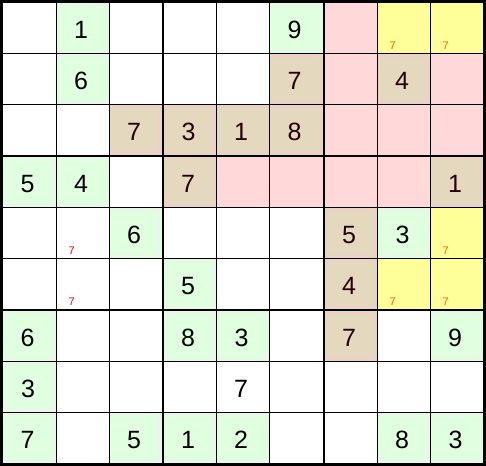
In the boxes on the right, the top and middle boxes are still missing the 7. In the top box, though, only two cells are possible, while in the middle-right box there are three cells where a 7 could go. Again, note this with small digits as pencil marks.
Step 5
Now let’s look at the 5. In the boxes on the left, only the top box is missing the 5. Since the 5 in the boxes below already sits in the first and third columns, only the second column is left for the top Sudoku box. Of the three possible cells in that middle column, however, two are already givens, so you can conclude that the 5 goes in the bottom cell of the first box on the left. So enter the 5.
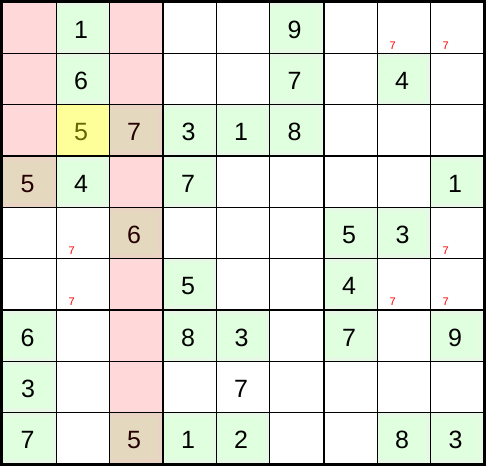
Step 6
In the bottom-middle box, there are two possible cells for the 5, and the same goes for the top-middle box. Here too, note the 5 as a small pencil mark in those Sudoku cells for later.
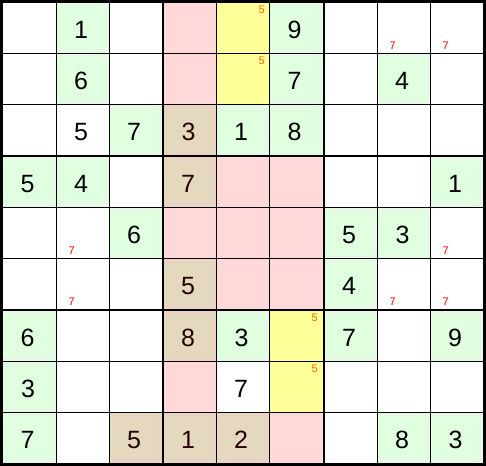
Step 7
In the boxes on the right, the 5 is still missing from the top and bottom boxes. At the bottom there are three possible positions, and at the top there are also three. As usual, mark them all.
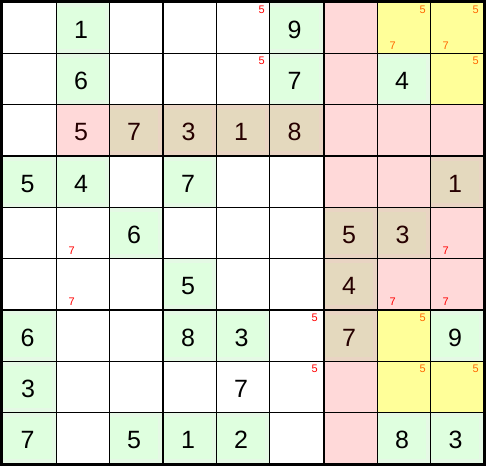
Step 8
Looking at all the 3s in the grid, you’ll notice that some cells can be ruled out for them as well. In the boxes on the right, only the top box is missing a 3, and there are two possible cells for it.
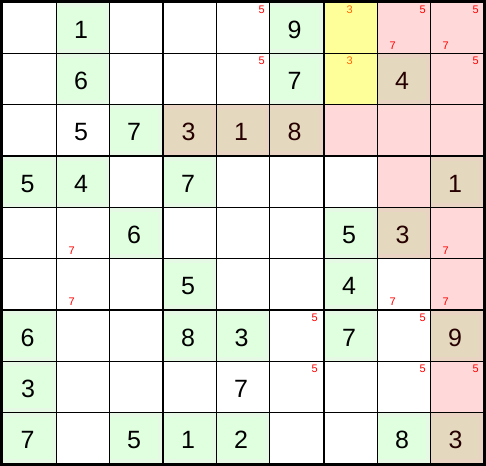
Step 9
In the center box of the Sudoku, too, a 3 fits in only two cells.
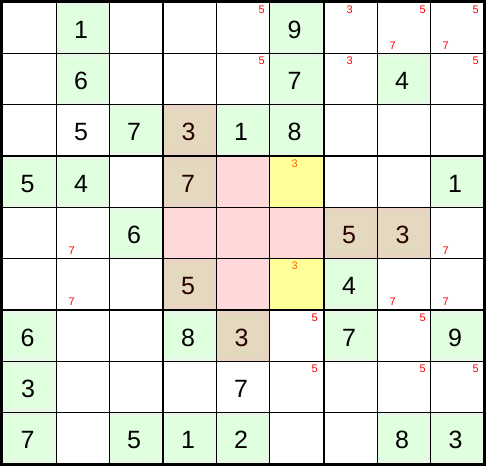
Step 10
In the three boxes on the far left, the 3 is still missing from the top two boxes. For these, mentally go through all the rows and rule out the rows that already contain a 3. Then do the same with the columns to find out where the 3 could still go.
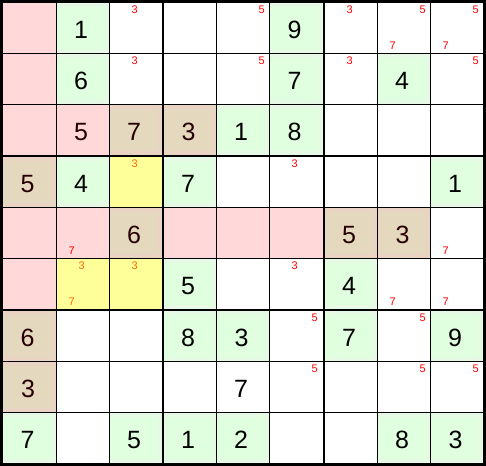
Step 11
Since the 9 appears only twice in the puzzle, set it aside for now and move on to another digit.
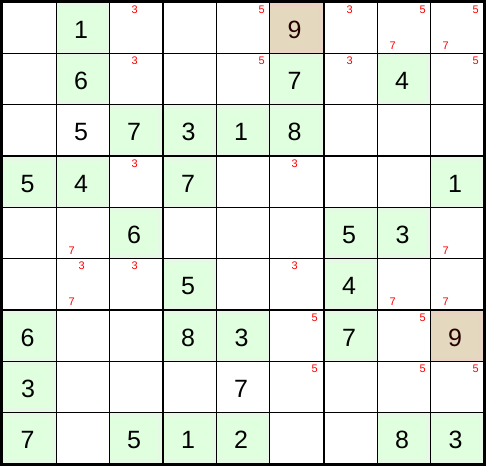
Step 12
As usual, start scanning the rows and columns of the Sudoku grid for the 1. After entering your candidates as pencil marks, you’ll notice a position in the top-right box where a 1 clearly fits. So enter a 1 there.
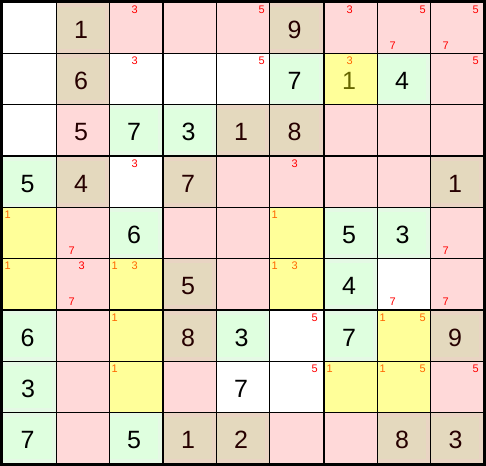
Step 13
Since you’ve just entered the 1 in a cell where you had also pencil-marked a 3, you can now say for sure that the 3 in this box must go in the only other remaining spot. Enter the 3 there and remove the pencil marks (on paper, cross them out or erase them; in the online game, for example, with a single click on the small X).
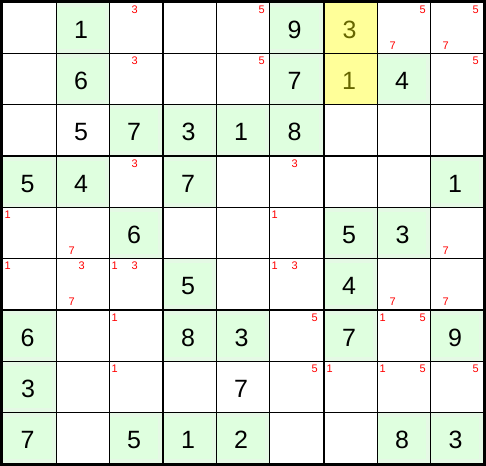
Step 14
Now that you’ve entered another 3, check the row and column of that 3 to see whether you had pencil-marked a 3 anywhere in them. That’s the case in the top row, so you can also remove the pencil marks for the 3 in the top-left box and enter another 3.
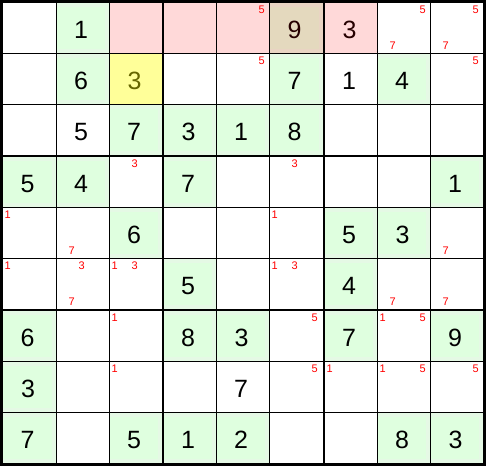
Step 15
Now repeat the same process for the row and column of the newly entered 3. And sure enough, two more pencil marks in the middle-left box can be removed, and another 3 can be entered with certainty. Also keep in mind for later that this 3 went into a cell where a 7 was pencil-marked. You’ll deal with that later, so leave the pencil mark in the cell with the new 3 for now.
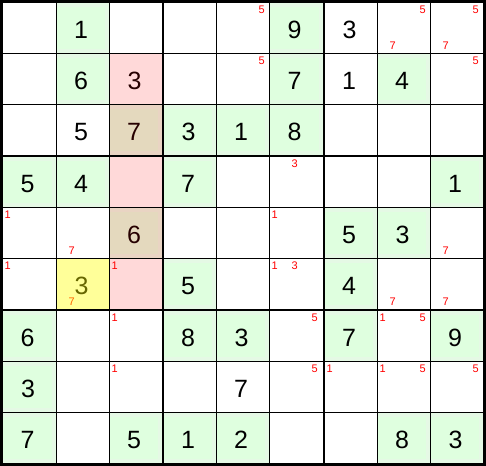
Step 16
Now another 3 can be placed with certainty, this time in the center box. After entering the 3, remove the pencil marks for the digit 3 in this box to keep things clear. With that, every one of the 9 boxes in the Sudoku grid now contains a 3.
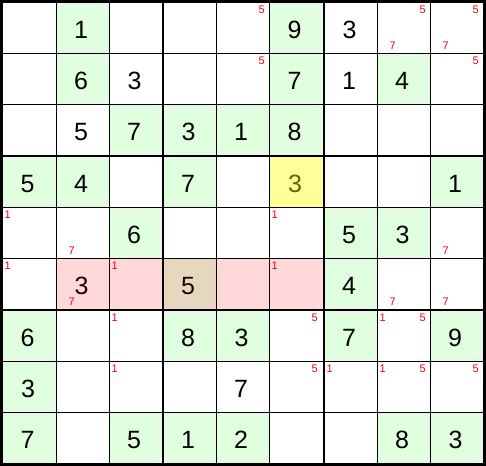
Step 17
Now turn to the 7 pencil mark that is still in the cell with the recently entered 3. Since one of the two candidate cells for the 7 now holds the 3, only the other cell is left for the 7. Enter the 7 there and remove its pencil marks. Also remove the pencil mark in the row of the newly entered 7 in the box on the far right.
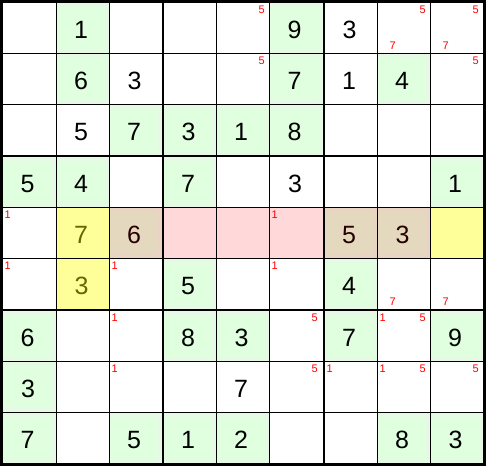
Step 18
Now let’s return to the system from the beginning: going through all the digits from 1 to 9, one at a time, and marking every possible spot in the Sudoku with small pencil marks. The digit to look for now is the 4. In the boxes on the right, it’s missing only from the bottom one. Since the ninth column in the bottom-right box has only one empty cell left, the missing 4 can only go there. Enter the 4 and remove the 5 pencil mark. This time nothing more follows from it, because there are still 4 possible cells for the 5.
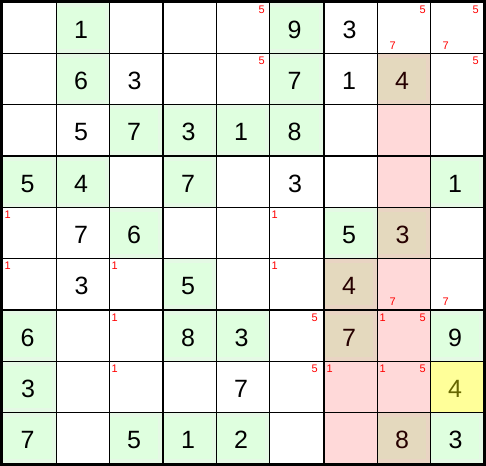
Step 19
In the middle column of boxes, you can now spot more candidate cells for the digit 4. In the bottom-middle box, there are two possible positions. Both are in the sixth column. In the box above it, the center Sudoku box, the 4 can only fit in the left and middle cells. The right cell isn’t possible, because you already know that the 4 in the box below belongs somewhere in the right column. The top-middle box, too, can hold the 4 in only two possible cells.
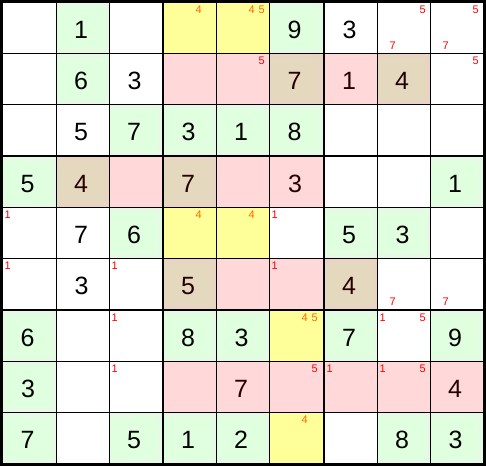
Step 20
Together, the boxes on the far left of the Sudoku contain only one 4. In the bottom box, the cells of column 1 are already givens and none of them is a 4, and the 4 in the middle-left box already sits in column 2. So in the bottom Sudoku box, the 4 can only go in one of the two remaining cells on the right. After scanning the rows, though, you can rule out one more cell, which leaves only one possible Sudoku cell for the 4. Enter the 4 there. In the top-left box, now add two pencil marks for the 4.
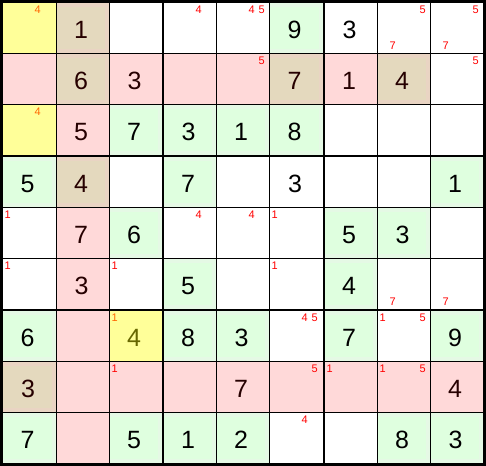
Step 21
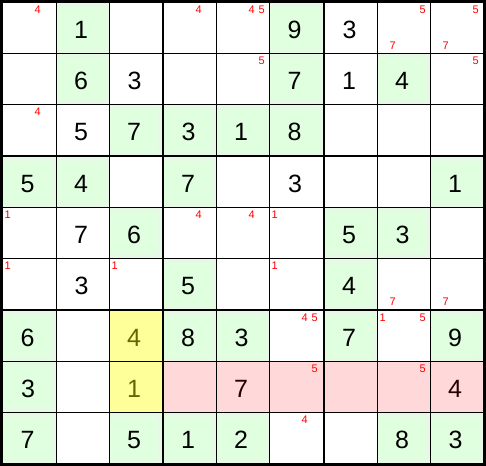
In the bottom-left box, you just entered a 4 in a cell that had a pencil mark for the number 1. Let’s deal with that now. Since one of the two options now holds the 4, only the other cell is left for the 1. Remove the pencil marks for the 1 and now look at the row of the cell with the new 1.
Step 22
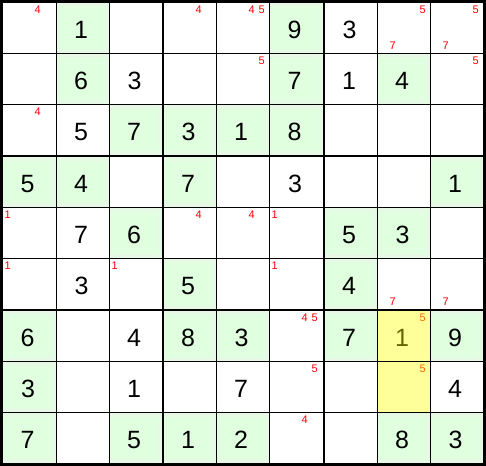
The row of the new 1 holds more pencil marks that you can now rule out as well. That leaves only one cell in the bottom-right box where the 1 can go. Remove the pencil marks, enter the 1, and check its row and column, this time without any further eliminations.
Step 23
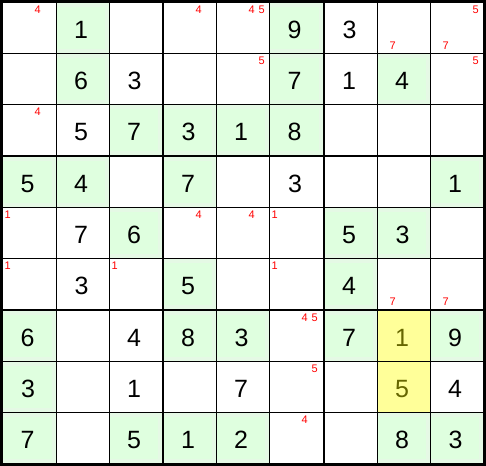
One of the two possible cells for the 5 is now taken, so only the other one is left for the digit 5 in the bottom-right box. Delete the pencil marks (including the one in the first row of this column) and check again whether any more numbers can be deduced in the same row or column. That’s the case here, namely in the bottom-middle box.
Step 24
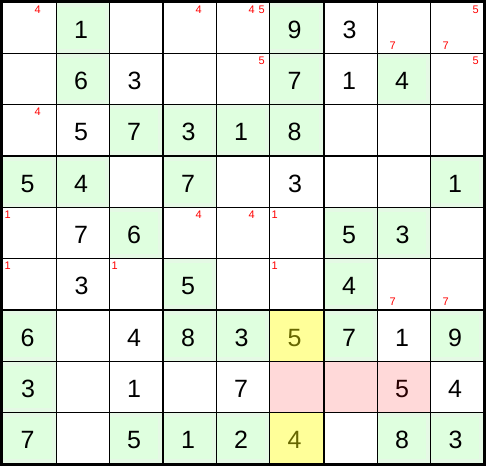
In the bottom-middle box, you can now enter the 5 in the top-right cell and delete the pencil marks for the 5 in this 3×3 box. But you’re not quite done here yet. Since a few steps earlier you entered a 4 in the box to the left, you can now also add the 4 in this box and delete its pencil marks.
Step 25
To complete the system you started at the beginning of the solution, finally check the digit 8 across the whole Sudoku grid. The 8 appears only three times among the givens. Even so, a few things can be said about possible candidate cells. In the bottom-left box, only one cell is possible, so you can enter an 8 there right away.
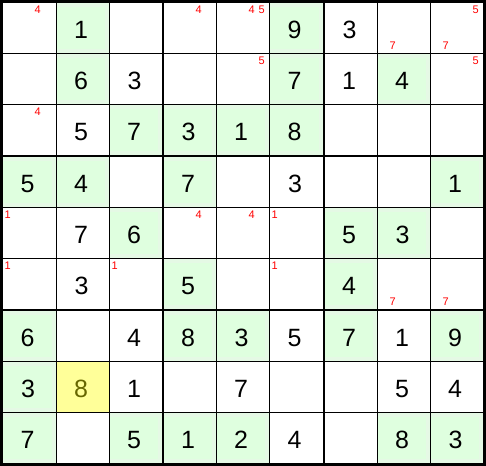
Step 26
In the center box, 3 candidates remain; mark them as pencil marks. Do the same in the remaining four boxes that don’t contain an 8 yet.
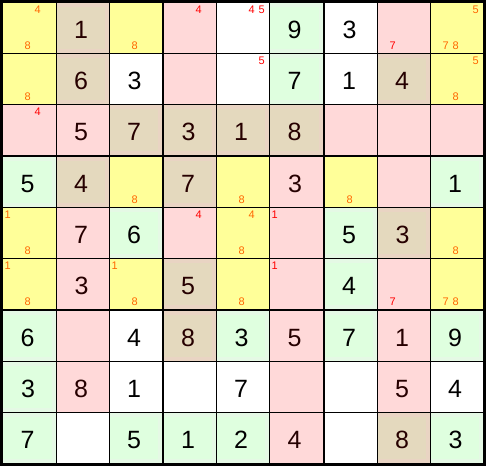
Step 27
You’ve now scanned all the digits from 1 to 9 against the givens and the numbers entered so far, and set your pencil marks. More eliminations now follow from the rule that every digit from 1 to 9 may appear only once in each column and row and, above all, must appear there. So pick any column or row that already contains as many numbers as possible, and complete that row or column if you can. Let’s take the third row from the bottom. Only one number is missing here, the 2, so enter it now.
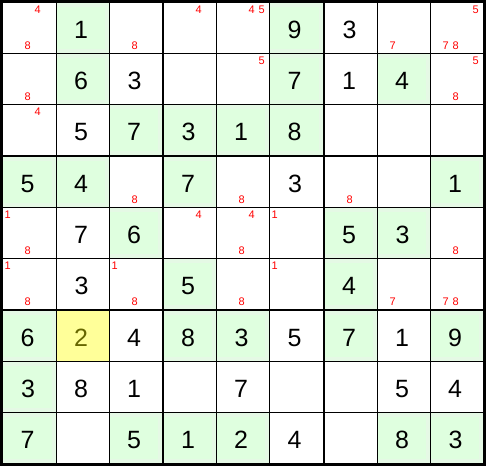
Step 28
Since there’s no 2 in the top boxes, you can’t enter or narrow down any more 2s there. In the bottom-right box, however, another 2 can be entered, because only one Sudoku cell is still empty in the next-to-last row. Enter another 2 there.
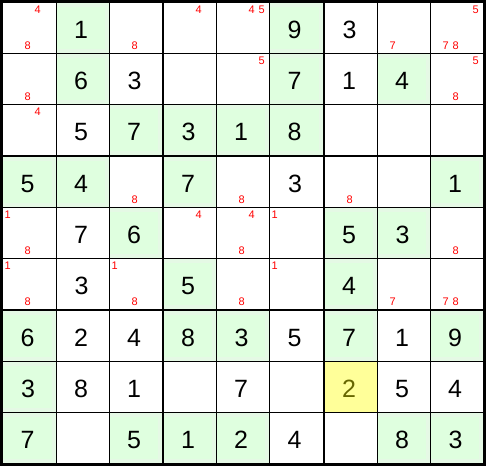
Step 29
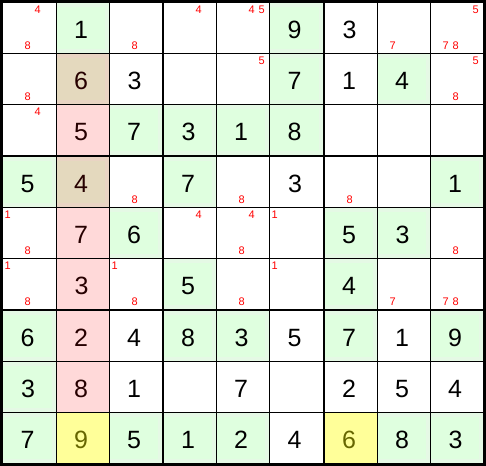
In both boxes where you just completed a 2, only one digit is missing now. So go through each possible number from 1 to 9 by counting, and add the 9 and the 6, one in each box.
Step 30
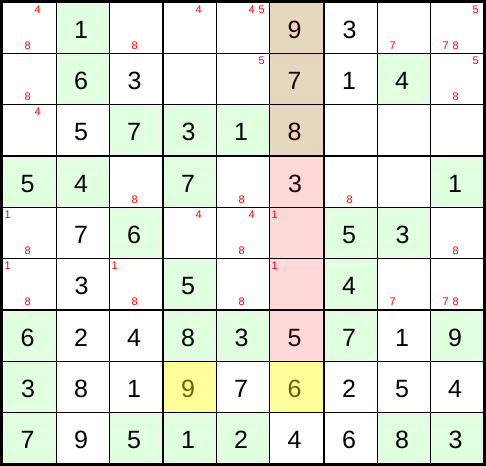
Now let’s look at the bottom-middle box. The two numbers still missing here are the 6 and the 9. But since the 9 already appears in the column of the right empty cell in this box, only the left empty cell is left for it. All that remains is to add the 6 to the right cell.
Step 31
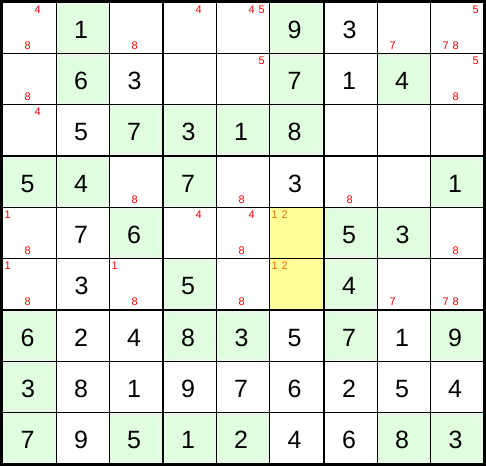
Next, look at any other column or row that already has as many numbers filled in as possible. This time, take the sixth column from the left. The numbers 2 and 1 are missing here. Since the 2 can’t be placed with certainty, at least set your pencil marks. That way, you’ll know later where the 2 can go in the center box.
Step 32
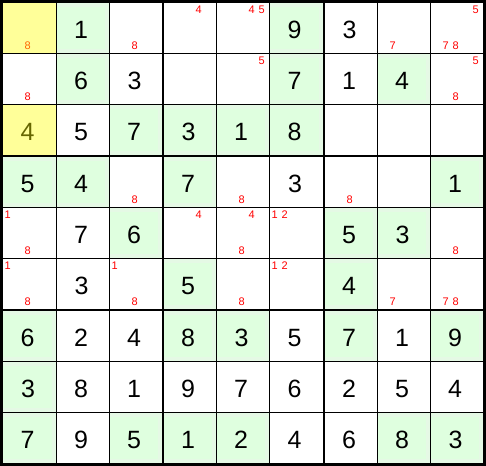
Now look at the third row from the top. Four numbers are still missing here, but a trained Sudoku eye can see right away that the 4 can only go in the left empty cell of this row. Why? Because the other 3 empty, possible cells belong to a box that already contains a 4, so a second 4 can’t be entered there. So enter the 4 and update all pencil marks for the 4.
Step 33
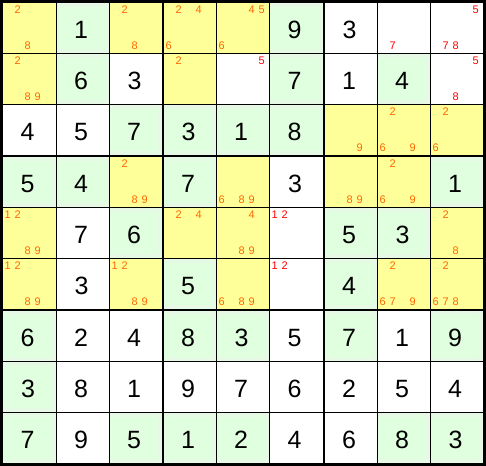
So you don’t get stuck while solving or have to search at random, take the trouble once more to complete all possible pencil marks for the numbers 2, 6, and 9 that were skipped at the start.
Step 34
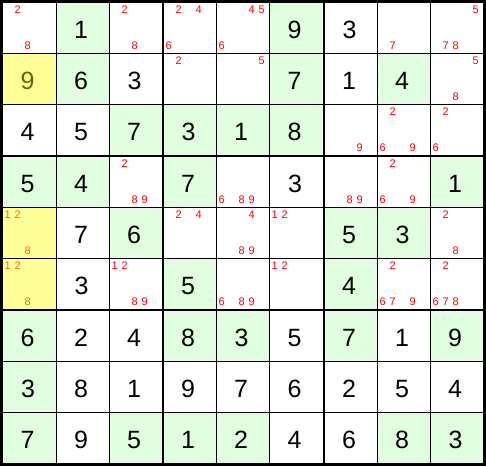
After systematically checking all the remaining numbers and entering their pencil marks, you can draw new conclusions. In the top-left box, there is only one pencil mark for a 9, so this number can go in only one cell here. After entering it, you can again remove all pencil marks from that column and row and see whether this leads to anything new. For the 9, that isn’t the case for now.
Step 35
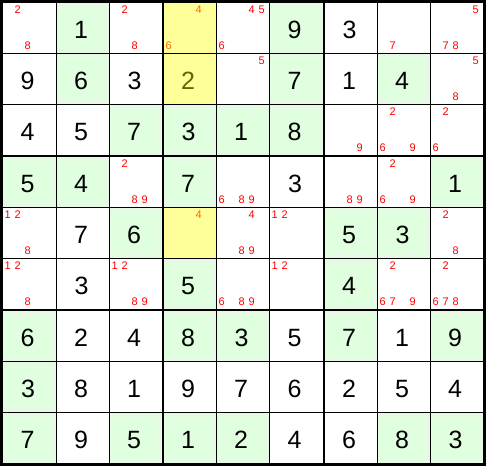
Now let’s look at the number 2 in the top three boxes. Since the 2 in the top-left box can only be in the first row, the 2 can’t also be in that first row in the top-middle box. So the 2 can go in only one cell of the top-middle box. Enter the 2 there and delete the pencil marks accordingly.
Step 36
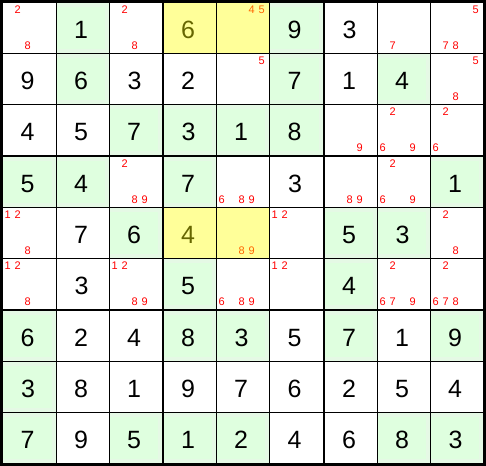
Now look at the column where you just placed the 2. Only two numbers are missing here: the 6 and the 4. Since the 6 fits only in the top cell, only the 4 is left for the other cell. Enter both and update the pencil marks for the 6 and the 4 in the affected rows and columns.
Step 37
In the top-middle box (the one the 6 just went into), you can now also place the 5 and the 4 with certainty, each in its own cell. After entering them, update the small, helpful pencil marks as usual.
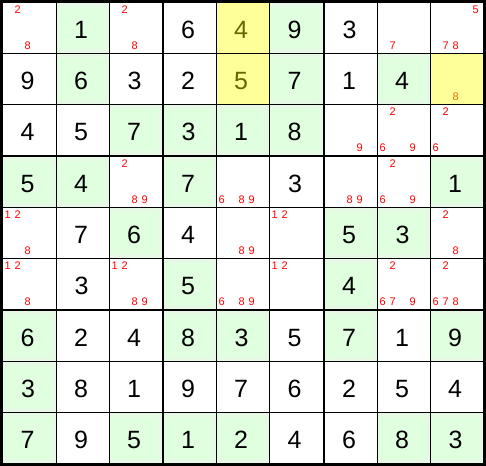
Step 38
Now on to the second row. Only the number 8 is missing here, so enter it and … that’s right: update the pencil marks ;-).
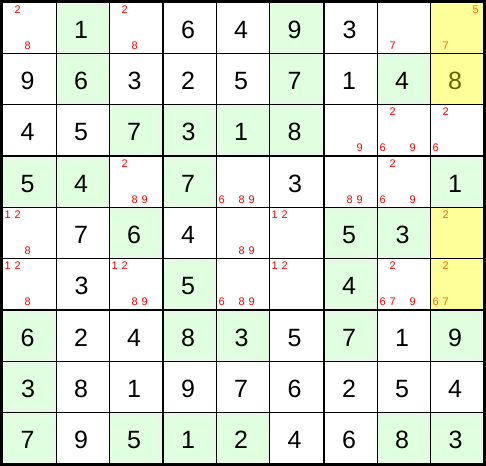
Step 39
Stay in the top-right box, the one the 8 just went into, and look at the number 5. There’s only one pencil mark for it. That also settles the position of the 7, so go ahead and enter both numbers.
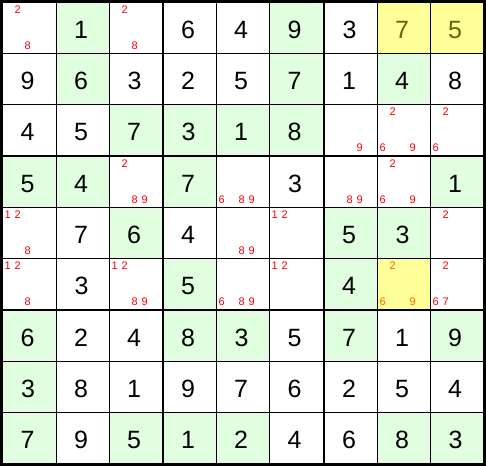
Step 40
In the same box, the 9 can now be placed, because the 2 and the 6 must go in the two cells on the right.
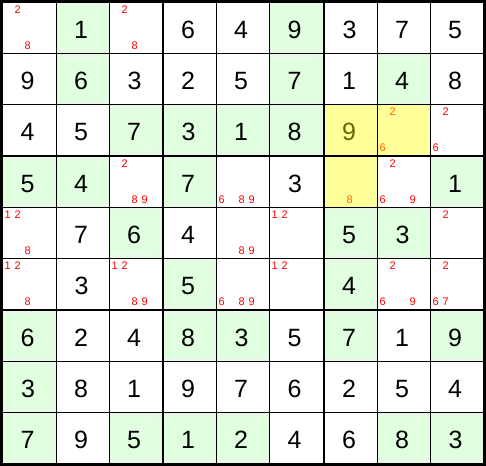
Step 41
Next, complete the third column from the right: only an 8 is missing here.
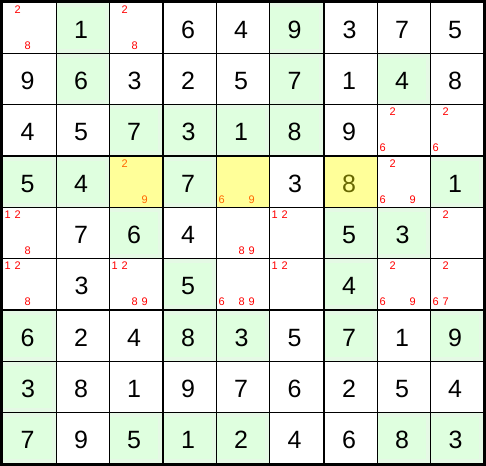
Step 42
In the middle-right box, there’s only one possible position for the 7, so enter it. With that, all the 7s in the Sudoku grid are now in place.
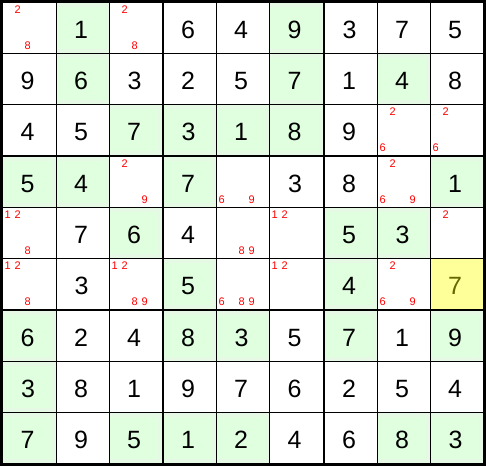
Step 43
In the ninth column on the far right, only the 2 and the 6 are missing now. The 2 can be placed with certainty, and with it the 6. Enter both. In the top-right box, also add the 2.
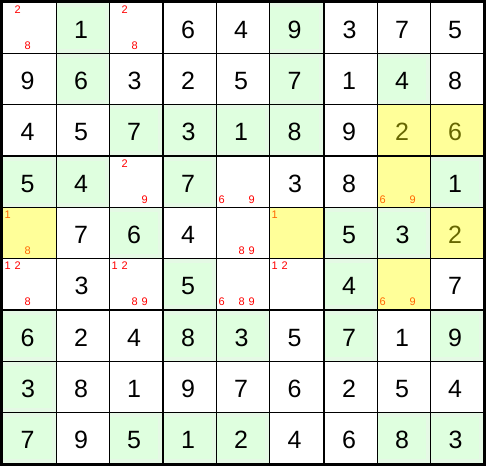
Step 44
Now on to the sixth column from the left: enter the 2 and the 1 here. As usual, update all pencil marks.
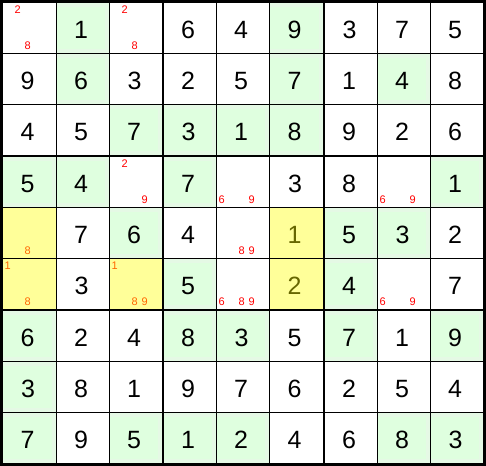
Step 45
In the first column, you can now also determine exactly where the 2, the 1, and the 8 belong. Since only the 8 is possible in one cell, enter it first. When you now remove the pencil marks, there is again only one cell each for the 2 and the 1. Again, update all rows in which you’ve entered numbers.
Step 46
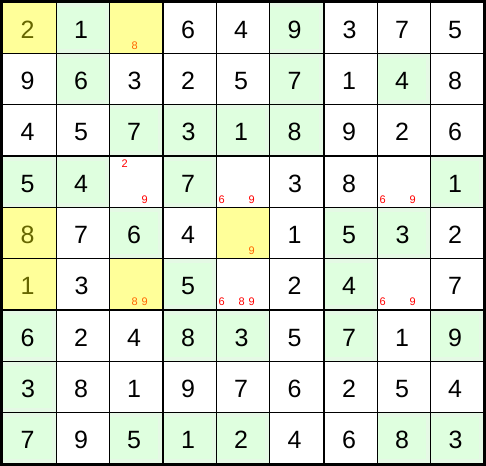
After adding these 3 numbers to the Sudoku grid, the next lead already catches your eye. In the third column, there’s a cell where only an 8 is possible. As you reduce the pencil marks further, the 2 and the 9 are now clearly the remaining numbers in this third column.
Step 47
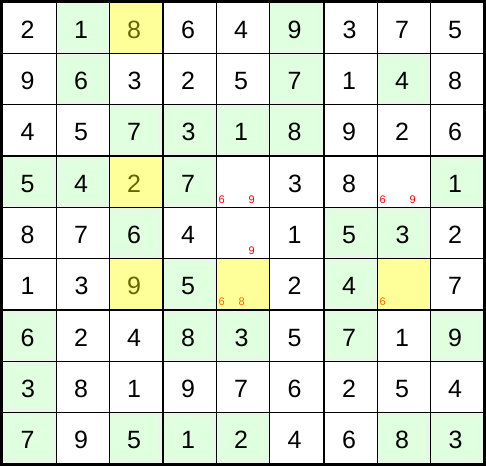
At this point, only 5 numbers are missing from the whole Sudoku grid. Let’s start with the next-to-last column: enter the pencil-marked 6 there and update. After that, the 9 and the 8 are left, each in a cell that is now clear.
Step 48
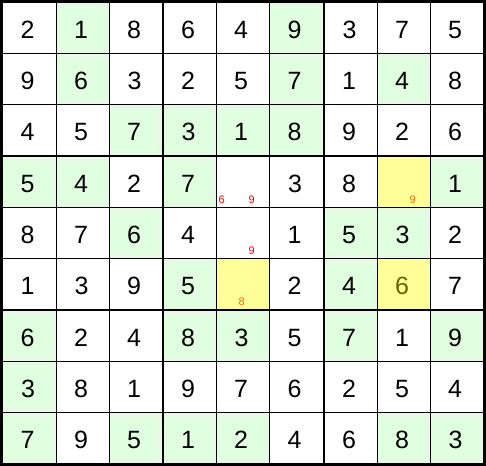
Enter the 8 and the 9, reduce the pencil marks accordingly, and you’re left with just two empty cells whose numbers are already there as pencil marks.
Step 49
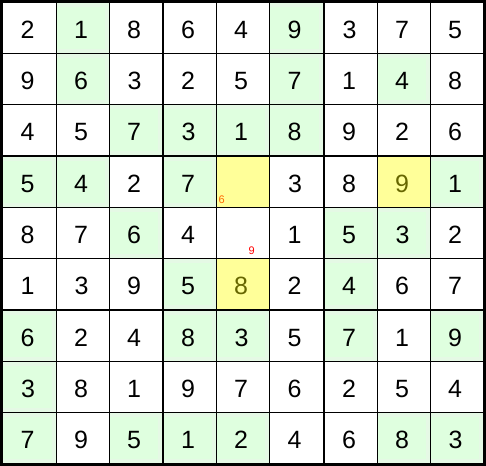
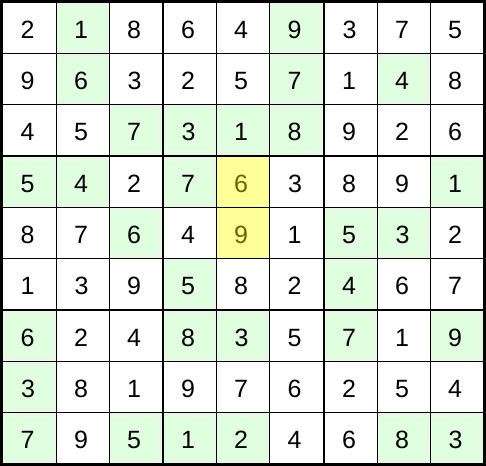
In the last step, enter the small pencil-marked numbers as the cell values, and the Sudoku is solved.
What’s next?
With this method you get through easy Sudoku puzzles to the last number. Try it right away on a new puzzle, to print or online. With hard puzzles, pencil marks alone are often no longer enough; then techniques such as the Naked Pair or the Pointing Pair help.
Found a mistake in the translation? Improve this translation